The 8 steps in plain English
- Inspect the tank inside and out, take “before” photos
- Drain the old water (and shut the inlet)
- Remove sludge and sediment from the floor
- Manually scrub walls, floor, and corners with food-grade brushes
- High-pressure jet wash to dislodge bio-film and scale
- Wet vacuum out the residual dirty water
- Disinfect with food-grade chemical, let it sit, rinse
- Refill, final inspection, walk you through the results
If a cleaner skips any of these — especially steps 3, 5, or 7 — you’re paying for a rinse, not a cleaning.
| # | Step | Time | Key equipment |
|---|---|---|---|
| 1 | Inspection + photos | 5-10 min | Camera, torch |
| 2 | Drain old water | 10-15 min | Pump, transfer drum |
| 3 | Sludge + sediment removal | 10-15 min | Scoop, sealed bucket |
| 4 | Manual scrubbing | 15-25 min | Food-grade nylon brushes |
| 5 | High-pressure jet wash | 10-15 min | 100-150 PSI industrial jet |
| 6 | Wet vacuum residual water | 5-10 min | Wet/dry industrial vacuum |
| 7 | Disinfection (20-min contact) | 25-30 min | Food-grade sodium hypochlorite (5% stock; 50-100 ppm in use) |
| 8 | Refill + inspection + photos | 10-15 min | WhatsApp + clipboard |
Book the real 8-step cleaning
All 8 steps documented, before/after photos, fixed price. Anything short of this is a rinse. ₹699 onwards.
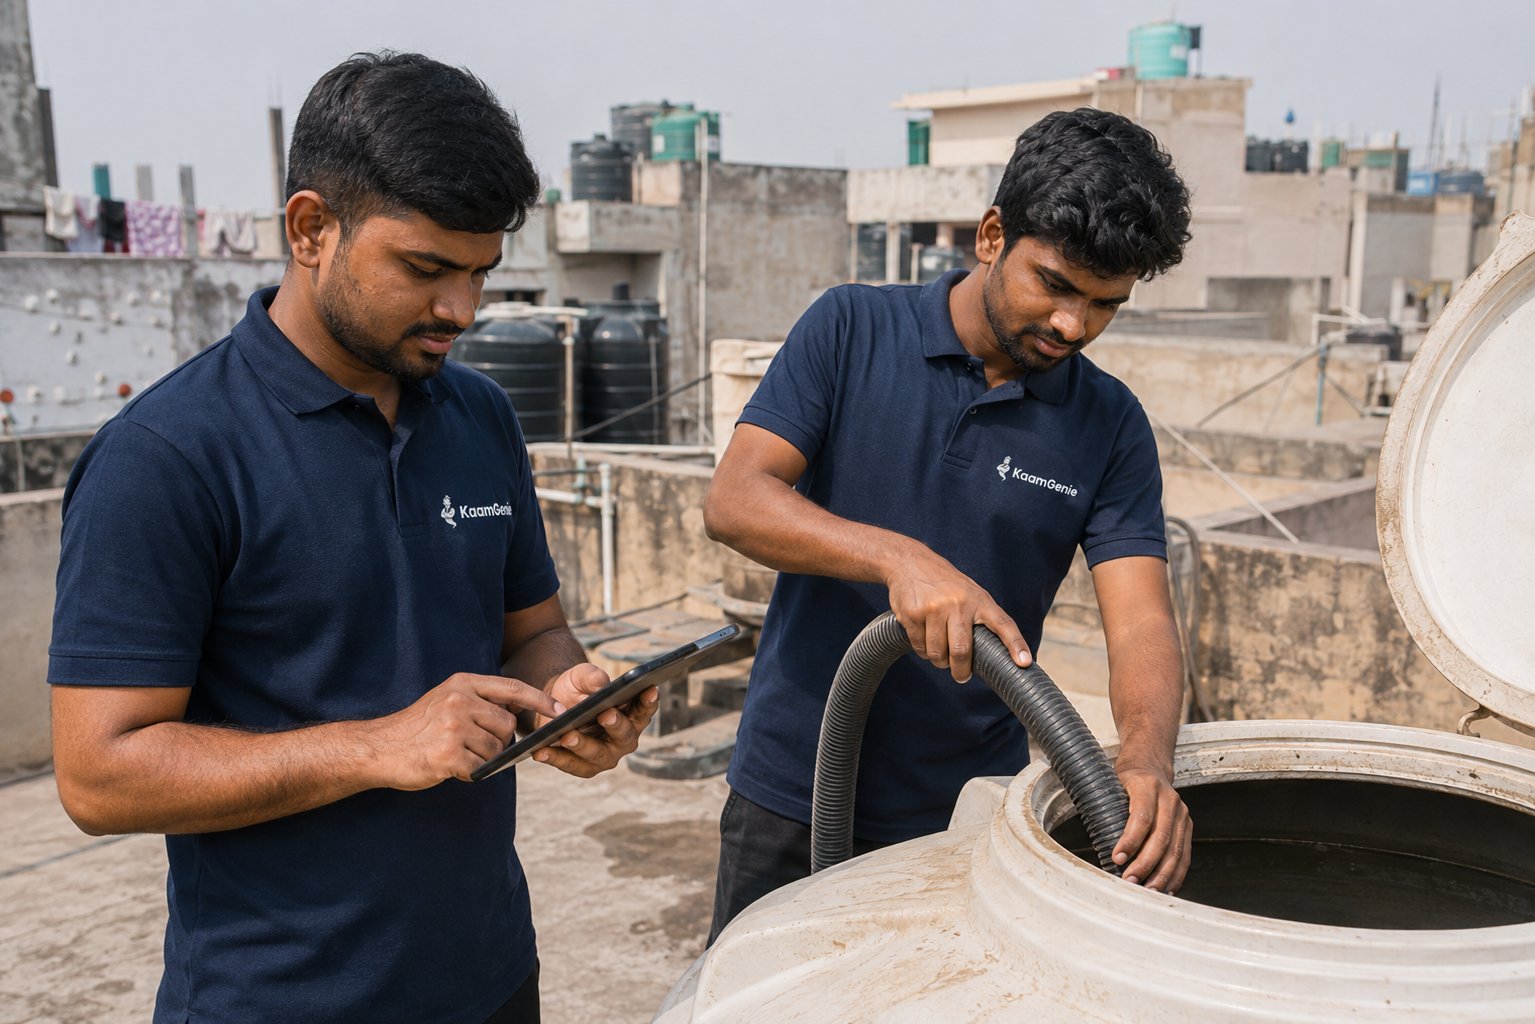
Step 1 — Inspection (before we touch anything)
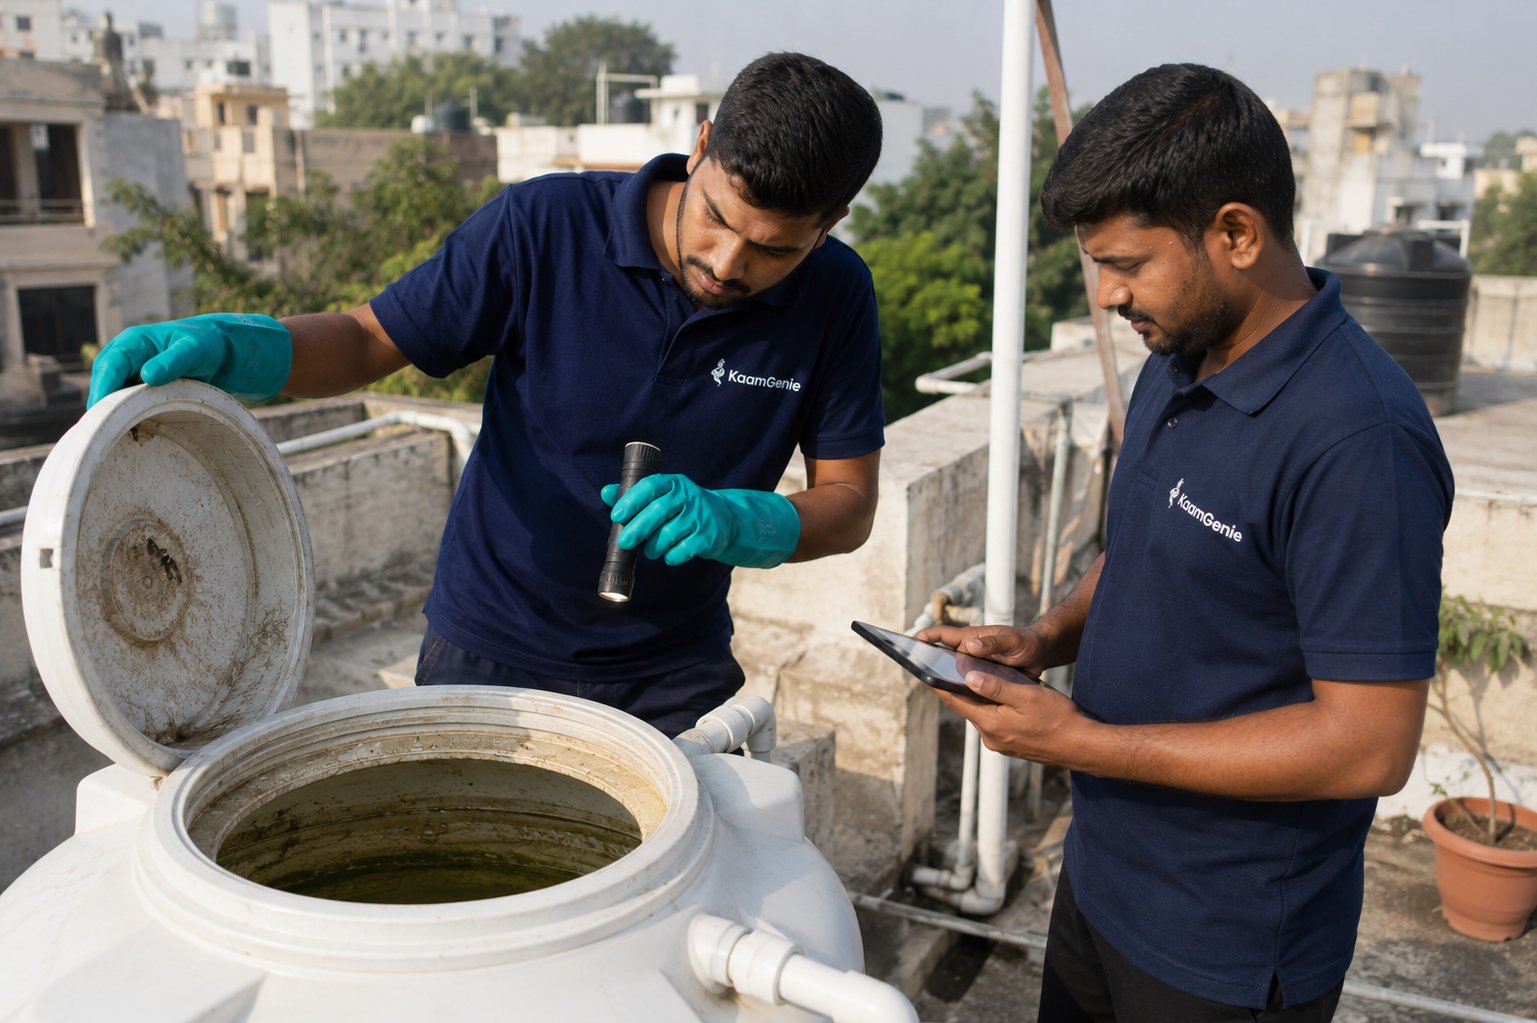
The first thing our crew does on arrival is open your tank lid and look. We’re checking three things: how dirty the inside actually is, whether the fittings (inlet, outlet, overflow, lid gasket) are intact, and whether there’s anything unusual — cracks, chemical staining, dead insects, animal droppings around the lid.
This isn’t just for show. The condition of the tank changes how we do the rest of the job. A heavily neglected tank that hasn’t been cleaned in 4 years needs more chemical and longer scrubbing than one that gets done yearly. A cracked tank needs to be flagged for repair before we refill it. A tank with a broken lid means we’ll suggest a replacement, otherwise it gets dirty again in a month.
We take 4-6 photos at this stage. They go to you in the service report.
Step 2 — Drain the old water
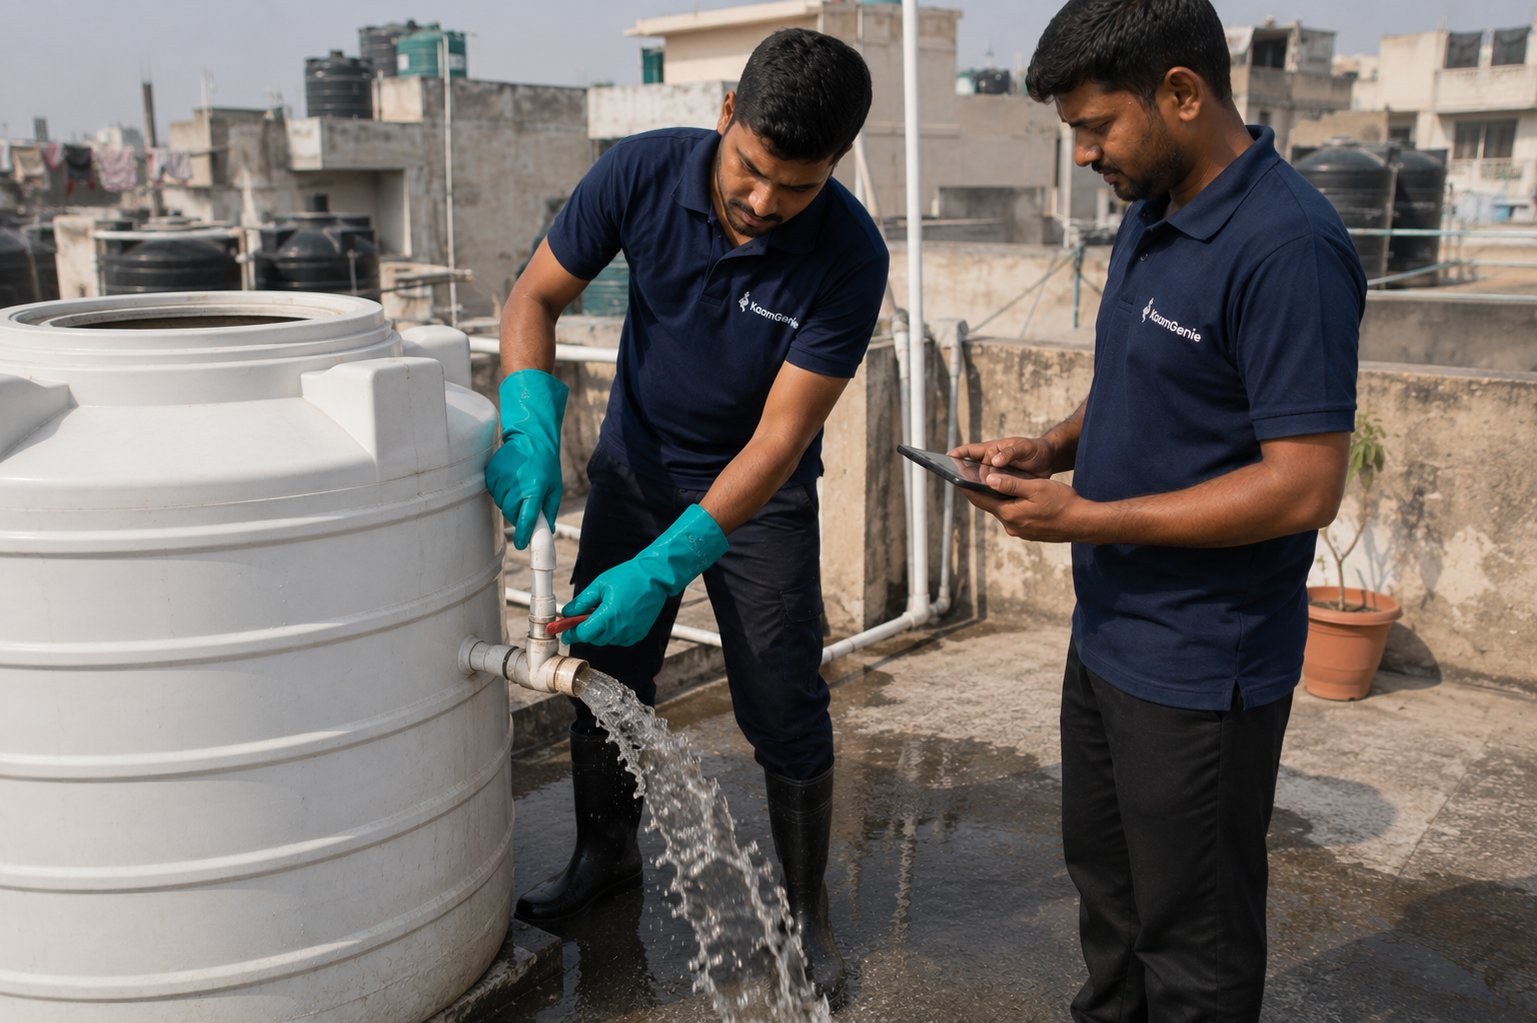
We close the inlet valve so no fresh water enters mid-cleaning, then drain the tank. Most rooftop tanks have an outlet pipe with a valve at the bottom — if yours does, we open it and let the water drain to the rooftop floor or into the building’s drain line.
If there’s no drain valve, we use a submersible pump to pump the water out into a bucket or hose it down the rooftop drain. For tanks with usable water (your tank just got refilled this morning), we offer to pump it into a storage drum so it isn’t wasted — you can use it for non-drinking purposes like floor washing or plants.
Drainage takes 10-20 minutes for a residential tank, longer for sumps because they hold more water and the pump-out is slower.
Step 3 — Sludge and sediment removal

Once the water is gone, the bottom of every Delhi tank has a layer of sediment. This is the stuff your filter doesn’t catch — sand, dust, rust particles from old DJB pipes, dead insects, dried algae, calcium scale. In a tank that hasn’t been cleaned in 2-3 years, you can be looking at half an inch of black sludge across the floor.
One crew member goes inside (or reaches in, depending on tank size) with a wide scoop and a bucket. The sludge gets scooped out by hand into the bucket and disposed of properly — not flushed back down your drain, where it’ll just settle in your building’s plumbing.
This is the dirtiest part of the job. It’s also the part that decides whether a cleaning was real or fake. A cleaner who skips this step and just rinses the tank from above is leaving the worst contamination right where it sits.
Step 4 — Manual scrubbing (the part that takes the longest)
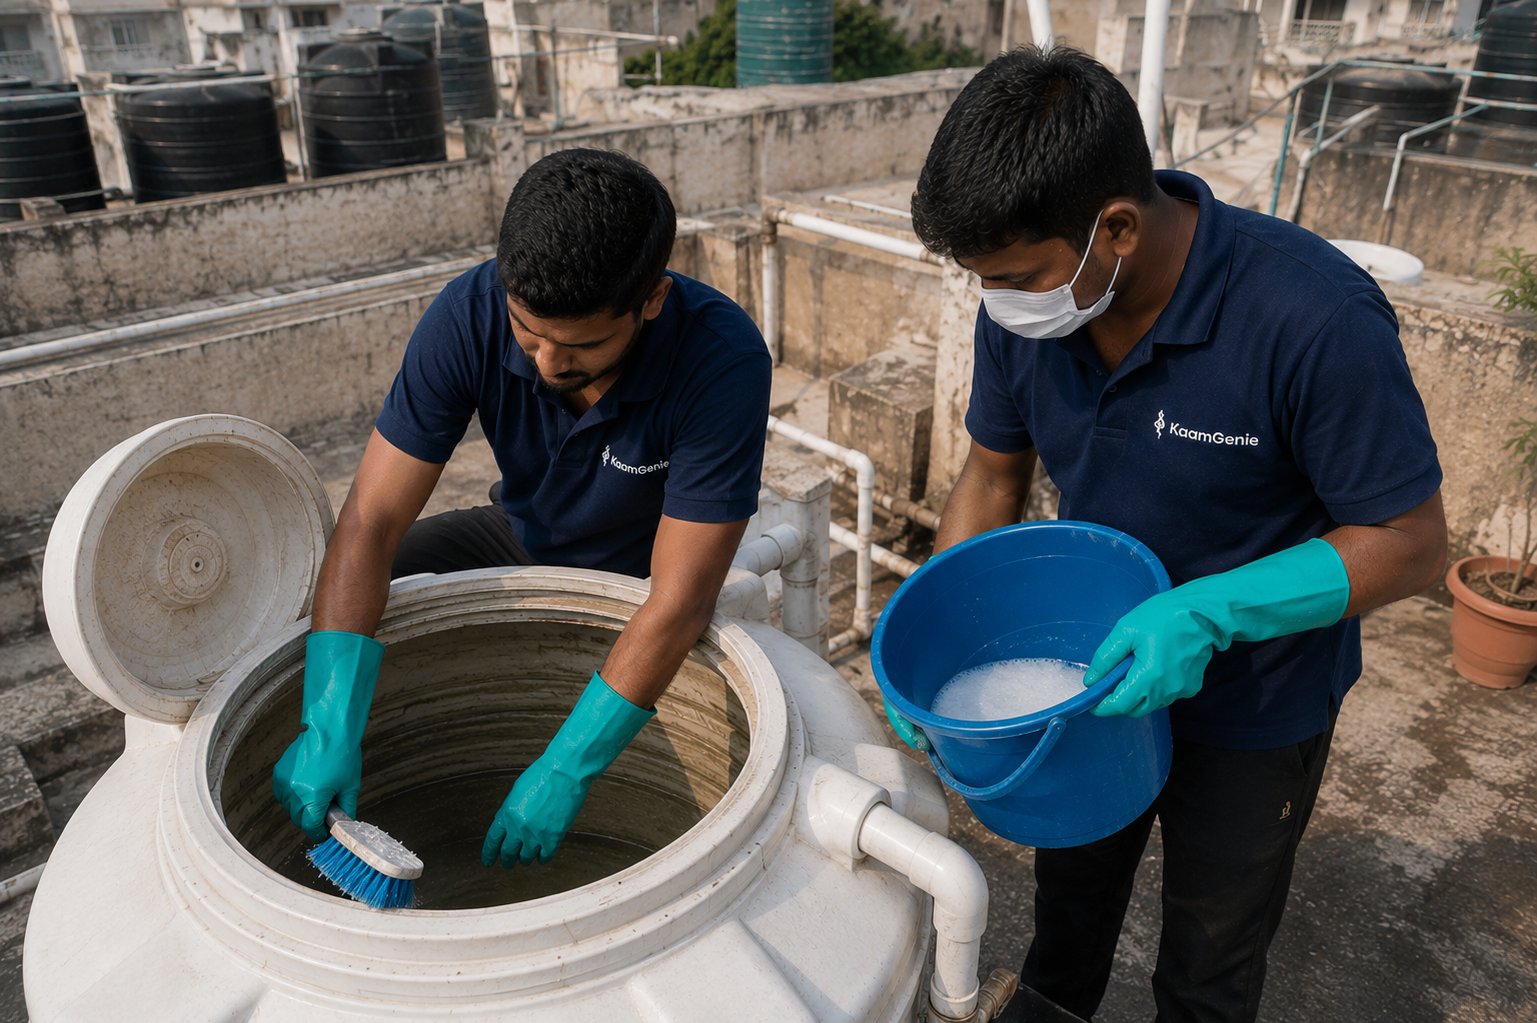
With the sediment out, the walls and floor still have a thin film — bio-film, calcium scale, organic deposits. This doesn’t come off with water alone. Our crew goes in with food-grade brushes (stiff bristles, never metal — metal scratches plastic tanks and creates new places for bacteria to hide) and a food-grade detergent solution.
They scrub:
- The four walls top-to-bottom
- The floor in overlapping passes
- The corners and seams (where bio-film hides)
- The area around the inlet and outlet pipes
- The underside of the lid (where condensation collects bacteria)
Manual scrubbing for a 1,000-litre plastic tank takes 25-40 minutes. For a 5,000-litre society reservoir, an hour or more. This is the step that separates a 90-minute job from a 20-minute fake.
Step 5 — High-pressure jet wash
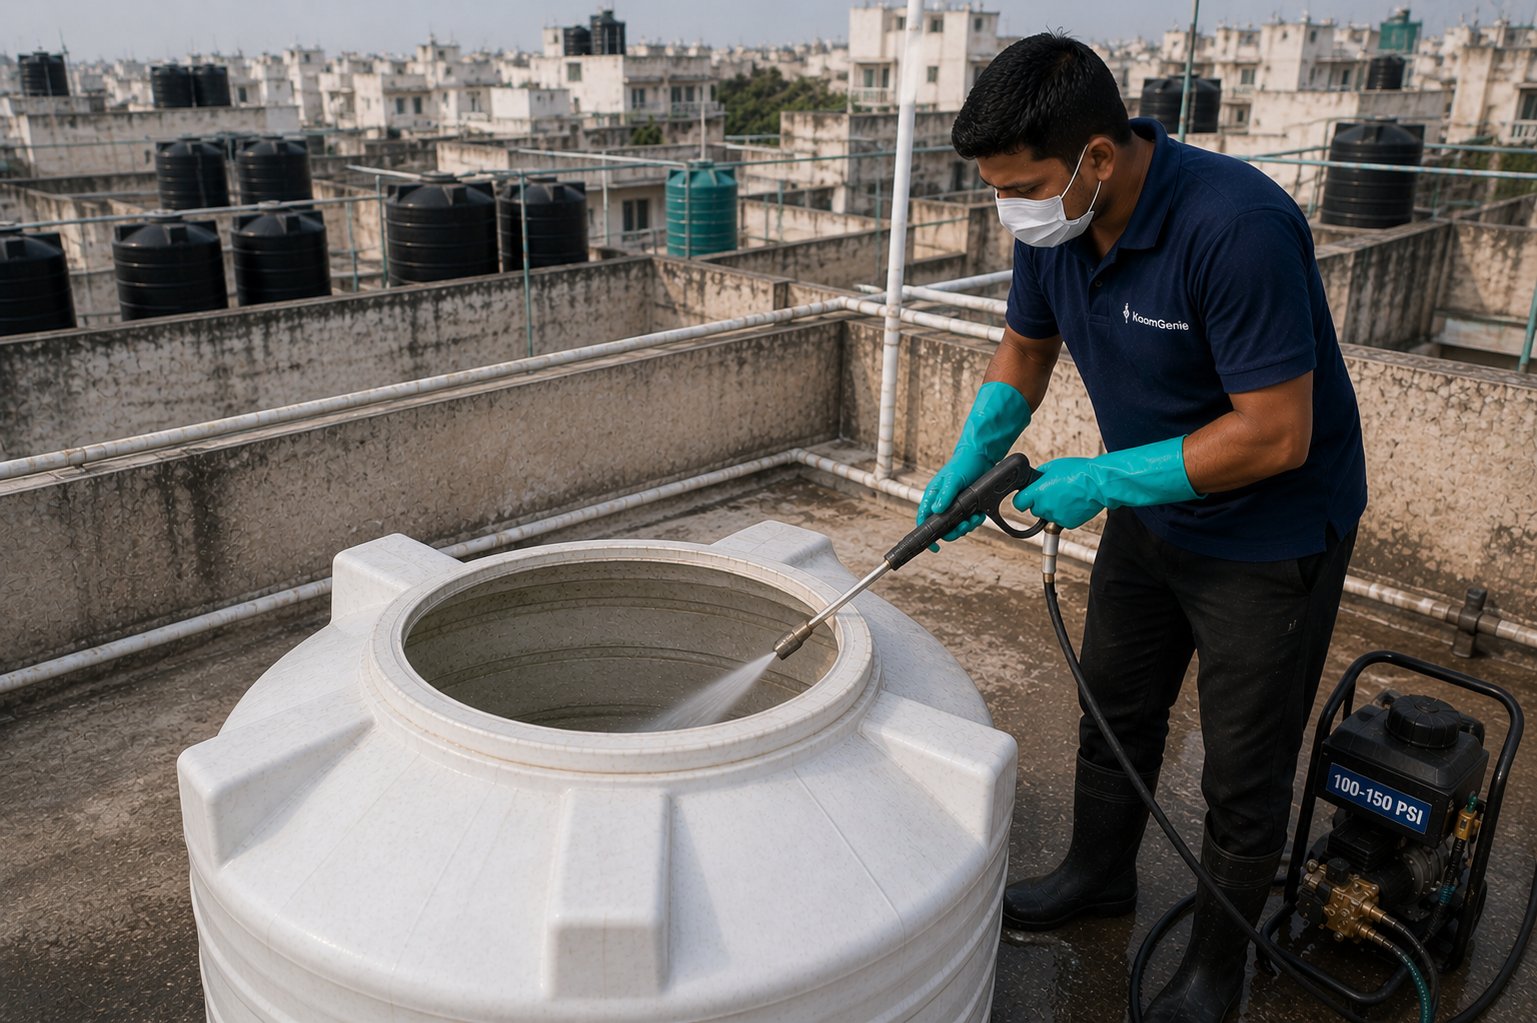
After manual scrubbing, we use a high-pressure water jet (100-150 PSI) to blast off whatever scrubbing didn’t fully dislodge. The jet reaches into corners, behind the inlet pipe, into the lid threads — places a brush physically can’t.
It also flushes the loose debris from scrubbing toward the drain, so the next step (vacuum) has less to remove.
For older RCC (concrete) tanks especially, the jet wash is critical. Concrete walls develop a textured surface over years where bio-film clings into the pores — only pressure can clear it.
Step 6 — Wet vacuum out the dirty water
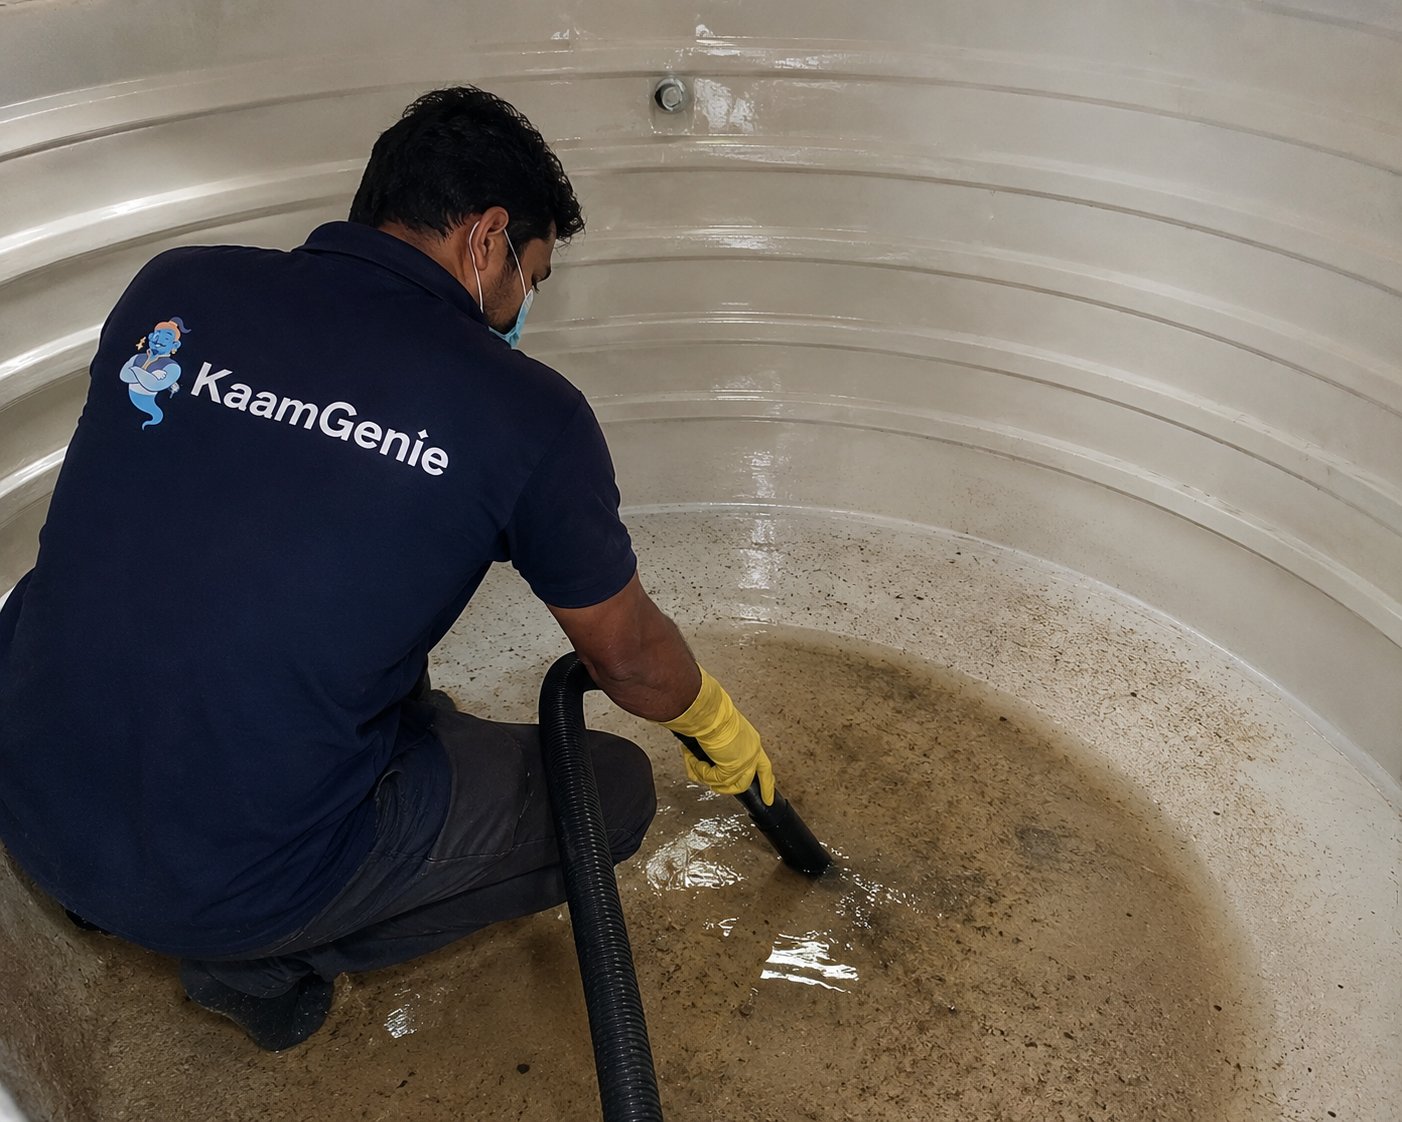
After the jet wash, the tank has 1-3 inches of dirty water at the bottom — full of dislodged scale, bio-film flakes, and rinse water. We use a wet/dry vacuum to suck this out completely.
The reason this matters: if you skip the vacuum and just open the drain, gravity gets most of the water out but a thin layer stays on the floor. When you refill, that thin layer redistributes everything you just dislodged back into the fresh water. The vacuum gets the floor as close to dry as possible before disinfection.
Step 7 — Disinfection with food-grade chemical
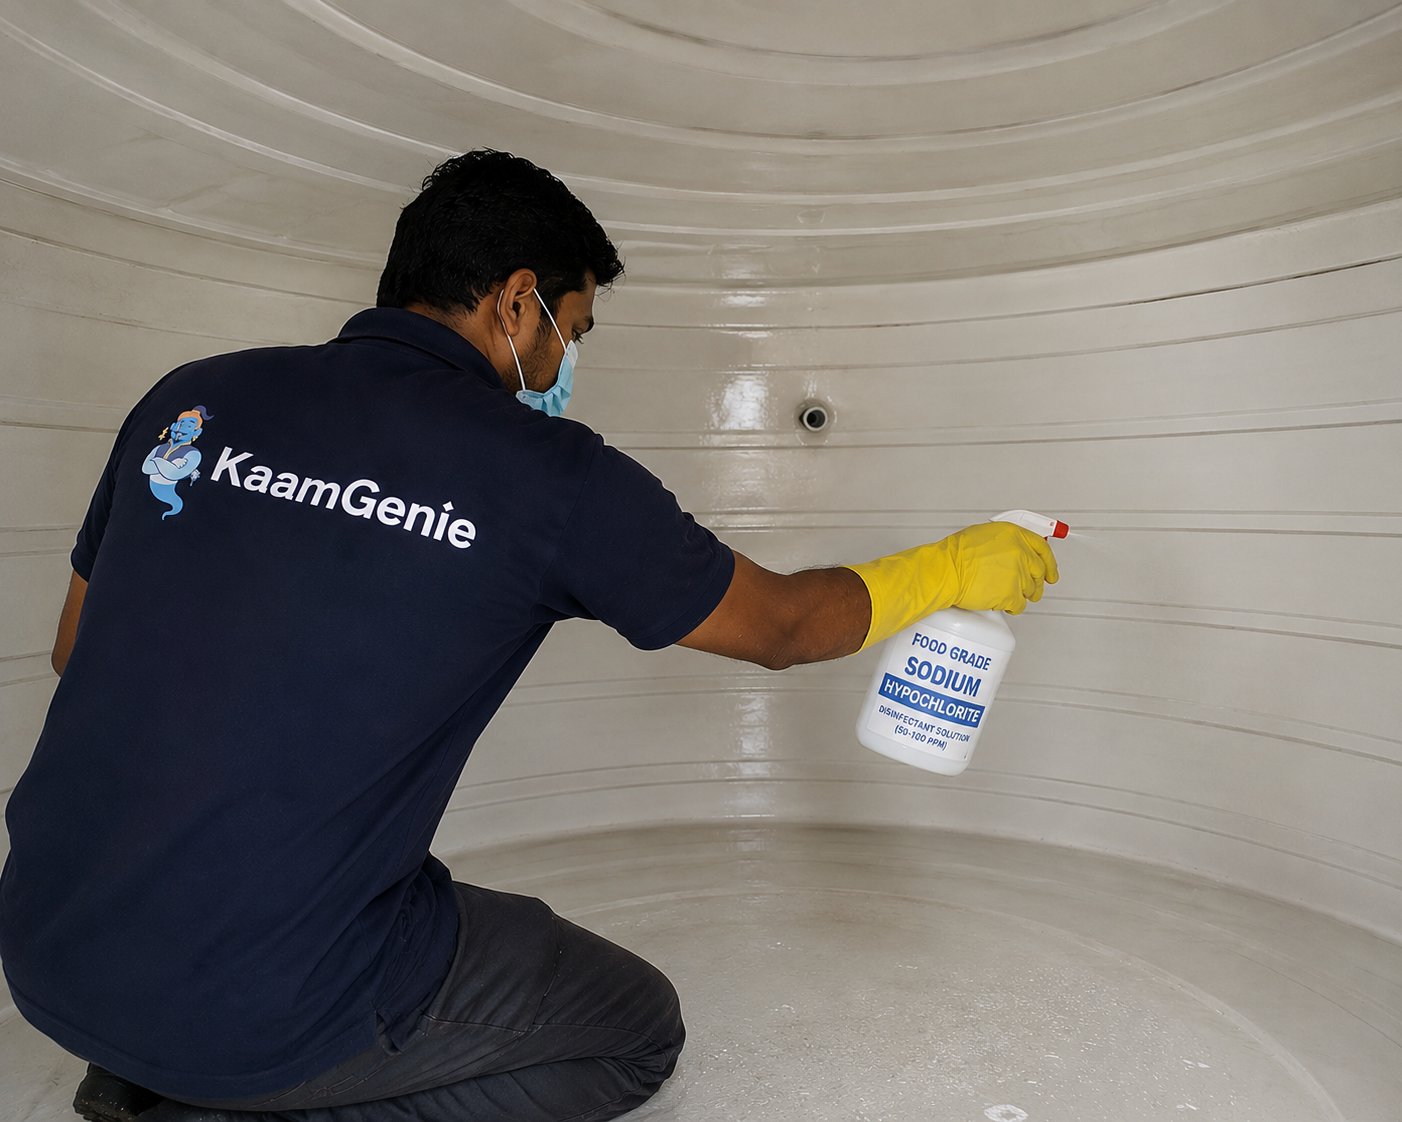
This is the step that actually kills bacteria, and the one most cheap operators get wrong — either by skipping it, or by using the wrong chemical.
We use food-grade sodium hypochlorite (50-100 ppm solution depending on tank size) or, for premium jobs, hydrogen peroxide. Both are FSSAI-acceptable for potable water systems. Industrial chlorine bleach — the kind you buy in a hardware shop — is NOT food-grade and leaves residue you don’t want in your drinking water.
The disinfectant is sprayed across all interior surfaces (walls, floor, lid, inlet/outlet area) and left to sit for 15-30 minutes. This contact time is what actually kills E. coli, salmonella, legionella, and the other organisms that cause stomach trouble and skin issues.
After contact time, we rinse the tank with clean water and vacuum it out one more time. The tank is now disinfected, empty, and ready for refill.
Step 8 — Refill and final inspection
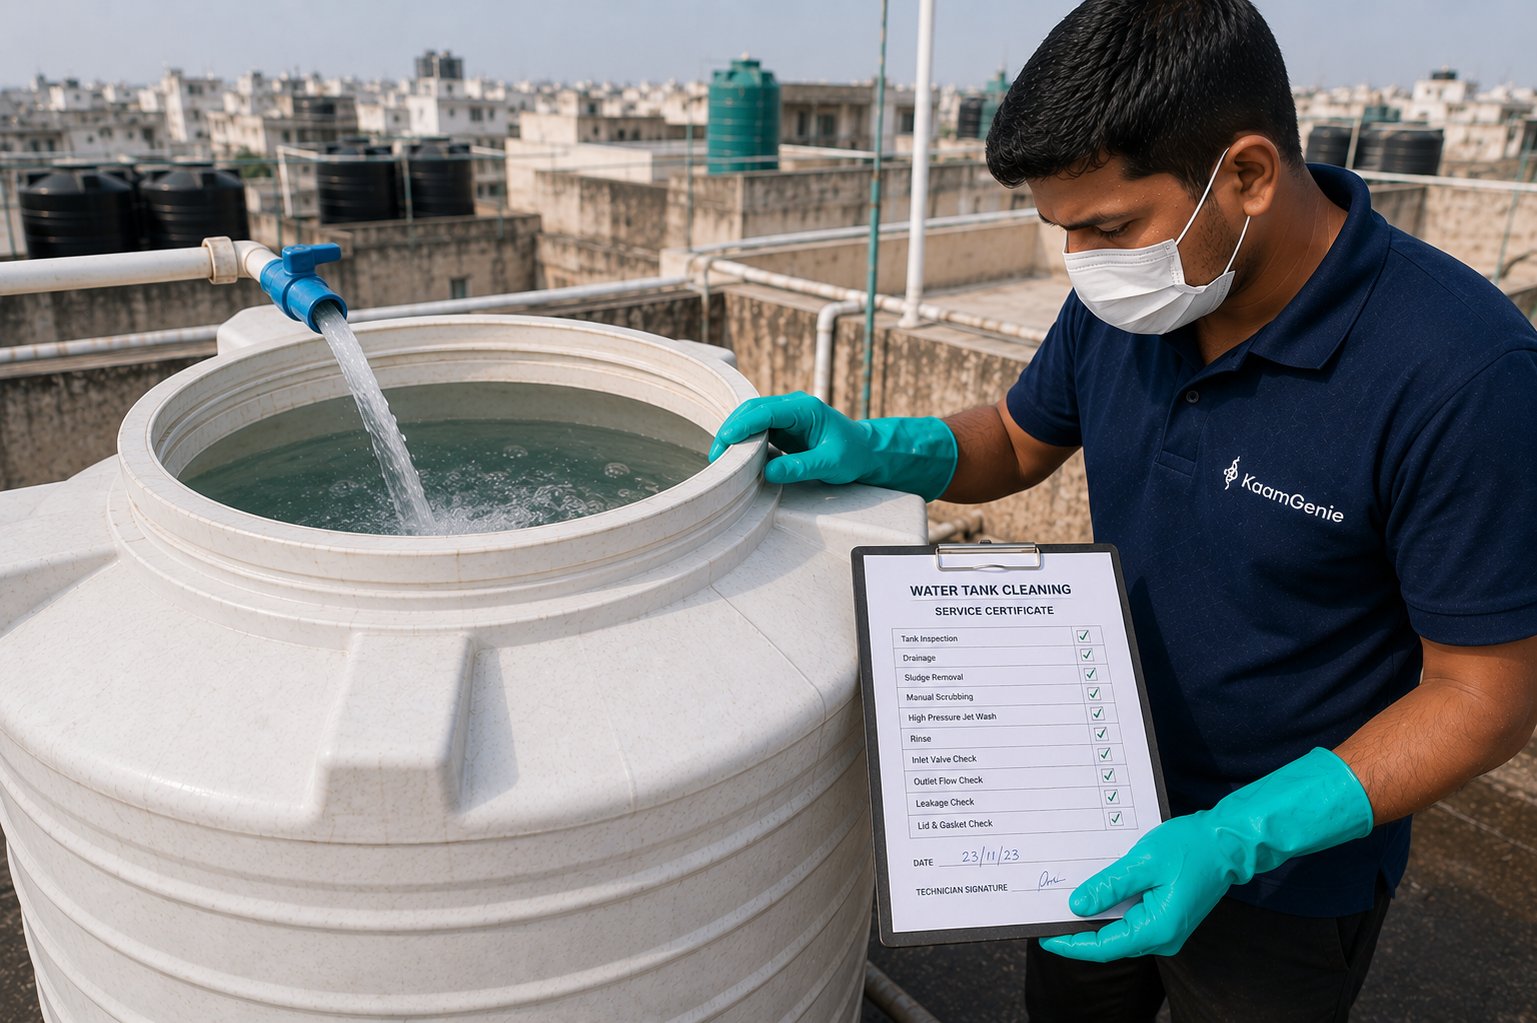
We close the drain, restore the inlet valve, and let the tank refill with fresh water. While it’s filling, we check:
- Inlet valve seals properly (no slow leak)
- Outlet flow is normal at your taps below
- Lid closes flush against the gasket
- No new leaks anywhere
We take 4-6 “after” photos — same angles as the “before” ones, so the difference is obvious. Then we hand you a cleaning record that lists: date and time, tank type and capacity, chemicals used, crew names, and the date of service.
That record matters more than people realise. If a society RWA ever asks for proof that your flat’s tank is on a maintenance schedule, this is the document. If a food business ever has an FSSAI inspection, this is what gets shown.
Time spent per step — 1,000L overhead tank, full 8-step cleaning
Disinfection is the longest because chemistry needs contact time
Total: ~88 minutes for a 1,000L overhead tank including setup and pack-up — within the typical 75–90 minute range. Larger tanks scale the scrubbing + disinfection steps proportionally.
How long the whole thing takes
Realistic timings, end to end:
- Residential overhead tank (up to 1,000L): 75-90 minutes
- Residential underground sump (up to 5,000L): 2-2.5 hours
- Society shared rooftop tank (4-8 flats): 90-120 minutes
- Society reservoir (10,000L+): 2.5-3.5 hours
- Industrial tank (20,000L+): 3-5 hours, sometimes a half-day with two crews
If a cleaner finishes a residential tank in 20-30 minutes, they didn’t do steps 3, 4, or 7. That’s a rinse, not a cleaning.
What corner-cutters skip — and why it matters
The cheap end of the market (₹200-300 jobs) typically cuts these steps:
- Sludge removal (step 3) — the hardest, dirtiest step. Skipping it means the worst contamination stays in your tank.
- Manual scrubbing (step 4) — takes 25-40 minutes of physical work. Skipping it leaves bio-film stuck to the walls.
- Jet wash (step 5) — requires expensive equipment (pressure washer). Most cheap operators don’t own one.
- Vacuum (step 6) — requires a wet/dry vacuum. Skipping it means dislodged dirt resettles when you refill.
- Food-grade disinfectant (step 7) — using cheap industrial bleach instead of FSSAI-acceptable chemical leaves chemical residue and may not kill bacteria reliably.
- Documentation (step 8) — no photos, no certificate. You have no record and no recourse.
Each shortcut saves the cleaner 10-30 minutes. That’s why a fake cleaning takes 20 minutes and a real one takes 90.
How to verify the job was done properly
If you’re home during the cleaning, here’s what to look for:
- Did they take before-photos when they opened the tank? (If no, the “after” photos won’t mean anything)
- Did someone go physically inside (or reach in fully) to scrub? (Not just spray water down from the top)
- Did you see them carry away a bucket of sludge? (If no, step 3 was skipped)
- Did you hear the jet washer running? (It’s loud — you’ll know)
- Did they use a wet vacuum at the end? (Different sound from the jet wash)
- Did they apply chemical and wait? (15-30 minutes of pause is normal — this is the contact time)
- Did they hand you a cleaning record? (Date, capacity, chemicals used, warranty)
- Did they show you the “after” photos before leaving?
If any of these are missing, ask why — politely. A real cleaner will explain. A corner-cutter will get defensive.
The equipment we actually carry
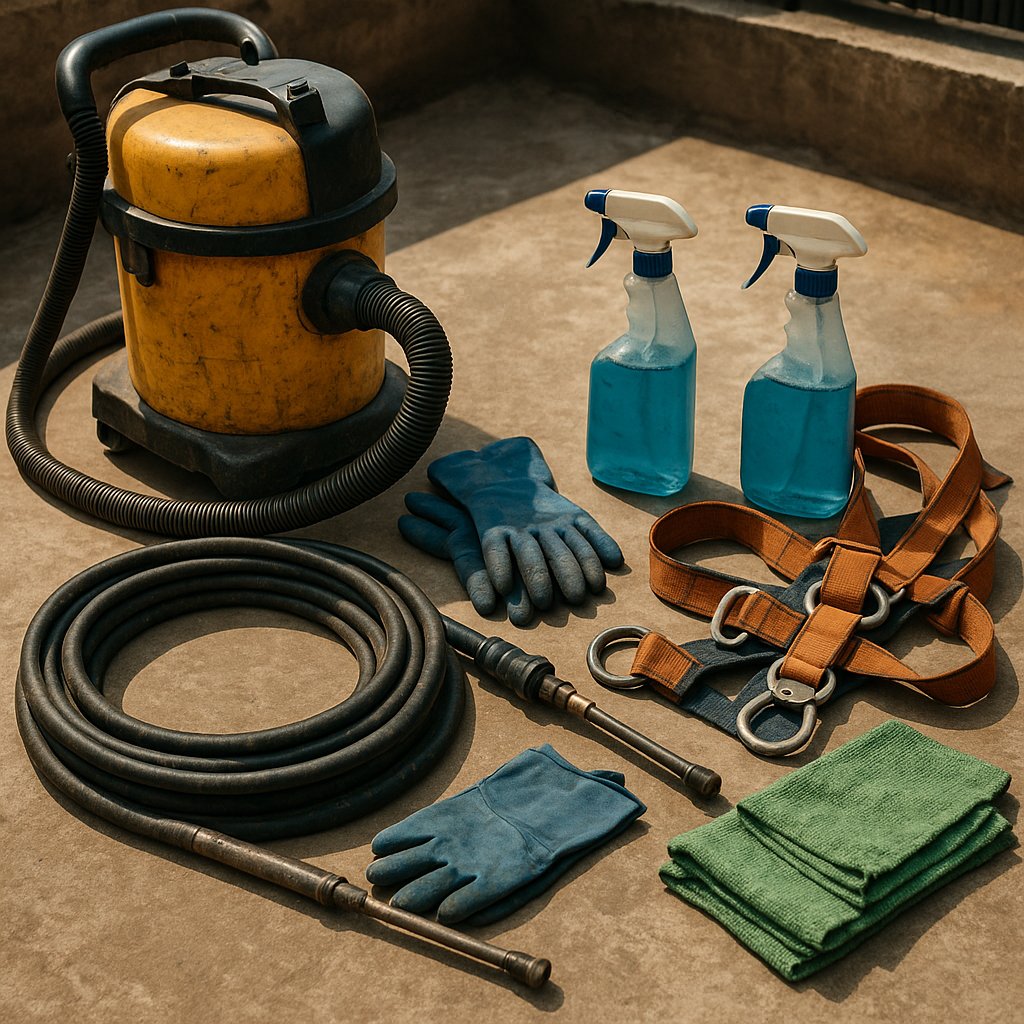
For full transparency, here’s what shows up on the truck:
- High-pressure water jet machine (100-150 PSI, electric)
- Wet/dry industrial vacuum
- Food-grade brushes (multiple sizes for walls, floors, corners)
- Submersible pump (for tanks without drain valves)
- Food-grade sodium hypochlorite or hydrogen peroxide
- Mild food-grade detergent
- Confined-space safety gear (for sumps)
- Gloves, masks, eye protection for crew
- Buckets, scoops, hoses
- Camera (for before/after photos)
- Pre-printed cleaning record forms
If a cleaner shows up with just a bucket and a bottle of bleach, you already know what kind of job you’re going to get.
Curious about your own tank?
Book a cleaning — you’ll see before-photos that often surprise even longtime customers. Standard residential cleaning ₹699 onwards.
Want to see this done at your tank?
If you’ve never had your tank cleaned by a real crew — or if it’s been more than a year — this is what we do. No shortcuts, photos before and after, certificate at the end. Pricing on our water tank cleaning service page.
To book, call +91 95603 66362 or use the booking form on this site — we'll confirm shortly.
Frequently asked questions
How long does the full 8-step cleaning process take?
For a typical 1000L residential overhead tank, 75-90 minutes from arrival to completion. Underground sumps take 2-2.5 hours. Society reservoirs and industrial tanks take 3-5 hours depending on size and access. The bigger the tank, the more time the manual scrubbing and disinfection contact phases take.
Do I need to be home during the cleaning?
Not necessarily, but someone needs to give us rooftop access. Many customers leave us to it and check the photos and certificate on WhatsApp afterwards. We can coordinate via one person — owner, family member, household help, or building caretaker.
What chemicals do you use in the disinfection step?
Food-grade sodium hypochlorite at 50-100 PPM concentration — the same compound used in municipal water treatment, FSSAI-acceptable for potable water systems. We never use industrial bleach or hardware-shop chemicals because they leave residue you don’t want in your drinking water.
Can the tank be cleaned without removing all the water first?
Not for a real cleaning. The bottom layer is where most of the contamination sits, and you can’t reach it with water on top. We pump usable water into a temporary drum so it isn’t wasted (you can use it for non-drinking purposes), but the dirty bottom layer has to be drained out.
What happens to the dirty water and sludge after cleaning?
The bulk drains down the rooftop drain or building drain line. The thick sludge from the bottom — the worst part — gets scooped into a sealed bucket and disposed of properly off-site. We don’t flush sludge down your building’s plumbing because it just settles in the pipes downstream.
Why are there 8 steps — can any be skipped to save time?
Each step does work the others can’t replace. Skipping inspection means no record of pre-existing damage. Skipping sludge removal means the disinfectant doesn’t reach the floor. Skipping the 20-minute disinfection contact time is the most common shortcut and the one that actually makes the cleaning ineffective. We don’t skip any step on any job.
What if my tank is too dirty for a standard cleaning?
Tanks that haven’t been cleaned in 2+ years sometimes need a 2-visit job — first visit removes the worst, second visit (a week later) does the proper 8-step process. Or a single extended visit (3-4 hours instead of 90 minutes) with stronger initial chemicals. The crew assesses on arrival and tells you honestly which approach you need.
Why food-grade chemicals — what’s the difference from regular chemicals?
Food-grade sodium hypochlorite is certified for potable water contact — no fragrances, no stabilizers, no heavy-metal contaminants. Industrial or pool chlorine often contains additives that are fine for swimming pools but unsafe in drinking water. The food-grade product costs more but is mandatory for any tank that supplies kitchen/drinking water.
Can the cleaning process damage my tank?
Very rare with a professional crew. The risks are: (a) over-aggressive jet wash on old/cracked plastic tanks — we adjust pressure based on tank age; (b) wrong brushes scratching the plastic — we use food-grade nylon, never metal; (c) chemical residue if the post-disinfection rinse is rushed — we never skip this step.
What’s the noise / disruption level during cleaning?
Minimal indoor disruption — most of the work happens on the rooftop or sump area. The jet wash makes some noise (similar to a vacuum cleaner) for about 10-15 minutes. Other steps are quiet manual work. You’ll typically only notice we’re there for the brief window when the jet wash is running.
Does the cleaning include the inlet and outlet pipes?
Yes — the inlet pipe (where water comes in) and outlet pipe (where water exits to your taps) are both scrubbed and disinfected as part of the standard 8-step process. If we find heavy mineral buildup or corrosion that’s beyond cleaning, we’ll flag it for separate repair — we don’t quietly ignore problems we can’t fix.
How long after cleaning before I can drink the water?
Roughly 30 minutes after refill, the residual disinfectant has dissipated to safe levels. For non-drinking uses (washing, bathing), water is safe to use immediately. For drinking, give it 2-3 hours and run through your RO/UV purifier as you normally would. The post-disinfection rinse step ensures no chemical residue beyond minimal safe levels.
Sources & references
- Bureau of Indian Standards (BIS) — IS 10500:2012 is the canonical Indian Standard for drinking water specification, defining acceptable limits for physical, chemical, and biological parameters.
- WHO Guidelines for Drinking-water Quality, 4th edition — the global reference for water quality standards, including guidance on storage and disinfection.
- Food Safety and Standards Authority of India (FSSAI) — defines water quality requirements for food businesses, including hygiene standards for stored water and acceptable disinfection chemicals.
- WHO Fact Sheet on Drinking Water — overview of safe drinking water requirements and contamination risks.
- CPHEEO — Manual on Water Supply and Treatment — the Government of India’s engineering manual covering tank design, cleaning protocols, and disinfection practices.
Last verified: 9 May 2026. If you find any of these links broken, please let us know.